写在前面
ACM(国际计算机学会)主办的推荐系统专场(Recsys)是推荐系统圈子的顶级会议,2018年ACM和spotify联合举办的Recsys challenge,本次比赛一共分为两个track,main track,只能用比赛方提供的数据,creative track,除了比赛方提供的数据还可以用外部数据。我和队友们在本次比赛的main track中,取得public board第六名的成绩,整个比赛,感谢我的老板兼队友提供的很多很好的idea,也让我对数据挖掘有了很多新的思考,这条路我还需要很多持之以恒的努力。
http://www.recsyschallenge.com/2018/
赛题描述
数据描述
本次比赛由ACM Recsys和Spotify联合举办的recsys challenge,赛题给定了一百万的歌单数据集,版权由spotify所有,本文之后将简称该数据集为MSD,具体数据详情见以下:
每个歌单metadata包括
playlist_duration, 歌单整体时长
playlist_title, 歌单名称
track_num, 歌单的单曲数量
last_modified_time, 最后一次修改歌单的时间
track, 每首单曲
each track’s position in the playlist, 每首单曲在歌单中的位置
每首单曲的metadata包括
track_name, 单曲歌名
track_duration, 单曲时长
artist, 单曲歌手
album, 单曲所属专辑
任务描述
比赛的大目标,即是自动延续歌单,给定一个歌单,歌单已经含有1-250首歌不等,要求预测出500首更高概率会出现在歌单里的单曲,按概率从高到低提交,这个任务在研究领域有个专业名称,playlist auto continuation, 本次比赛分为十个子任务:
- 只给定歌单名,预测500首单曲;
- 给定歌单名,给定最top的1首歌,预测500首单曲;
- 给定歌单名,给定按顺序出现的最top的5首歌,预测500首单曲;
- 不给歌单名,给定按顺序出现的最top的5首歌,预测500首单曲;
- 给定歌单名,给定按顺序出现的最top的10首歌,预测500首单曲;
- 不给歌单名,给定按顺序出现的最top的10首歌,预测500首单曲;
- 给定按顺序出现的最top的25首歌,预测500首单曲;
- 给定歌单随机位置的25首歌,预测500首单曲;
- 给定按顺序出现的最top的100首歌,预测500首单曲;
- 给定歌单随机位置的100首歌,预测500首单曲。
算法
因为此次比赛属于推荐性质的问题,大方法上,我们采用的是based-on item collaborative filtering, 针对赛题里十个子任务各自的特性,我们将十个子任务按其数据特性,分为4种case,对原有cf算法作了4个不同的改进。也是这次比赛,更让我体会到这类推荐任务,甚至数据挖掘想做好的前提,就是要深刻理解数据,根据数据的特性,来采用有效的方法,想起上周同一个比赛,老板eda发现的magic feature,提升了3个百分点,扯远了…
Based-On Item Collaborative Filtering
这个算法不作过多介绍,推荐算法老牌战斗机,简单概述就是,如果很多user喜欢item A, B, C,那么对于喜欢itemA, B的user,我给他也推荐C,简单的逻辑,好用的算法;
优点:相比based-on user collaborative filtering, based-on item计算更加efficency,因为绝大数多场景,user的数量总是远远过于item的,另外因为user的偏好往往更多元,举个例子,一个人喜欢听周杰伦的‘告白气球’,他也可能喜欢听钢琴曲‘土耳其进行曲’,这是很常见的,可是这两首歌在同一歌单出现的概率,应该不太大,同一歌单中的单曲,应该总有某个部分的相似性,促使它们被放在同一歌单。
缺点:协同过滤的算法,往往会更倾向推荐热门的歌单,使得一些小众的歌得不到重视。
Task1-Subtask 2,3,4,5,6
上面提到,我们根据不同子任务的数据特性,将2,3,4,5,6这五种子任务,归为同一种任务,按同一算法来推荐;所用的主要方法就是based on item collaborative filtering, 这个方法几乎用在了除子任务1以外的每个子任务:
先根据提供的MSD data构建一个大的item-user矩阵,MSD data中共有100万个歌单,和2262292首distinct的单曲,歌单即是user,单曲即是item,那么这里把所有原始数据构造成了一个大的[2262292, 1000000]的矩阵,本文以后将简称这个矩阵为大矩阵, 注意,就像绝大多数推荐系统的item-user矩阵一样,这个大矩阵有很强的稀疏性,如果初始化用一个稠密矩阵去做,很可能内存就爆了,我们采用了稀疏矩阵的办法,极大的节省了内存
`
import scipy.sparse as sp
mat = sp.dok_matrix((2262292, 1000000), dtype=np.float32)
for song, pids in dic.items():
for pid in pids:
mat[song, pid] = 1
mat = mat.tocsr().sorted_indices()
`
假定歌单中有[A, B, C, D, E]五首歌,先计算A和所有歌曲(2262292)每首歌的相似度,这里的相似度就是依赖A和每首歌曲的共同歌单的数量,对于A和任一单曲,song1,假设只有单曲A出现在歌单list1, list2, list3,song1出现在歌单list3, list4,那么A和song1共同歌单的数量就是1,对song1的打分就是1,依次用A去对2262292每首歌计算共同歌曲分数;再用B去对2262292每首歌计算共同歌曲分数,接着C, D, E,把每首歌的5个结果求平均,再按每首歌得分从高到低排列,选取除掉已出现在歌单中的[A, B, C, D, E]五首歌,剩下的top500,即为我们的推荐歌单;
但这里的问题是,仅仅用共同歌单数,会导致那些热门歌曲,出现在很多歌单的歌,有更高的概率被推荐,这个时候热门的因素会胜过相似的因素,怎么办?很自然可以想到,我们可以用共同歌单数量,除以每首歌各自出现的歌单数量;这样不就可以平衡热门单曲的因素了吗。
在这个思路上,我们参考了这位大佬的论文:
http://www.ke.tu-darmstadt.de/events/PL-12/papers/08-aiolli.pdf
大佬在论文提出了一个创新的公式,简单概括,这个公式的分母除以了这首歌和被推荐的歌的出现频率的n次方的积;这样可以很好的平衡掉热门歌曲的因素,使得一些小众歌也可以被“平等对待”;
大佬的源码也给出来了,给了我们很好的参考,我们在此基础上作了修改和一些优化,因为我们的数据集更大,同时很稀疏,我们采用了稀疏矩阵方式进行计算,极大的提高了计算速度。
Task2-Subtask 7,9
这两个子任务都是给定一个歌单的前n首歌,来预测推荐的500首歌。相比之前只给1首歌,5首歌,10首歌,这里的25首歌和100首歌会有一定的序列特征,这个比赛最有意思的地方,就是同一大任务下小任务各自的数据特性,深入挖掘数据特性,应数据制宜,才是提高推荐效果的关键。怎么利用这里的序列特性?之前在Task1中采用的算法,歌单的每首歌都被同等对待了,所有歌曲中一首歌和这整个歌单的相似度,由这首歌和歌单每首歌相似度的平均值来计算;但这里,我们对在靠近尾部的歌,其计算的相似度给了更高的权重,之前是简单的average, 加权重以后变成了weighted average.
Task3-Subtask 8, 10
这两个子任务是给定一个歌单随机位置的n首歌,来预测推荐的500首歌。我们在基本算法的基础上,应用上了SLIM。
Task4-Subtask 1
之所以把子任务1放到最后来写,是因为这里有很有意思的创新,分享出来希望也能帮到大家。我们以上的基本算法是根据单曲-歌单的共现关系计算相似度进而推荐,但子任务1只给定了歌单名,除此之外没有过多的信息。我们想到,歌单的名字在一定程度上和歌单里的单曲是有很大的关系的,比如一个歌单叫”爱的进行时“,那很大程度,它含有大量的爱情相关的单曲,比如”告白气球“,比如”你问我爱你有多深“,等等;这个时候另一个歌单叫”爱的故事“,那这两个歌单在单曲上应该会有相当大的一部分交集,也就是说,歌单的词-单曲的共现关系也是可以用起来的!延续基本算法,我们构建了词-单曲的稀疏矩阵,作了类似cf的算法,来说说实现细节:
(1)首先是这些歌单名作了一些简单的自然语言处理,pipeline如下:
lower words -> remove repetition characters -> remove special characters
先小写所有字母,去除一个单词中连续重复出现2次以上的字母,只保留一个,最后去掉一些字母以外的特殊符号,这里因为都是英文所以不需要分词处理,source code也给出来了,参考着一个kaggle大佬的kernel写的
https://github.com/LauraBowenHe/Recsys-Spotify-2018-challenge/blob/master/src/utilities/title_preprocess.py#L7
(2)我们在第一步处理完,可以得到clean title,这个时候,根据所有单词的unique数量,和所有单曲的数量,做一个 词-单曲的稀疏矩阵,矩阵shape是[词数量,单曲数量2262292],假设歌单名叫’party’,把’party’这个词那一行,对应的该歌单所有出现的单曲的位置+1,当另一个歌单叫’party dance’,我们把’party’和‘dance‘对应的两行,对应的该歌单所有出现的单曲的位置+1,这样在最终预测时,比如歌单名叫’happy party’, 我们找到’happy’和’party’对应的那两行,[2, 2262292]的相似度小矩阵,求平均,得到[1,2262292]的相似度矩阵,然后和之前一样,按概率从高到低选取top500。
一些赛后想到的idea
赛后感觉还是有很多可以提高的方法:
task 4中自然语言处理的那部分可以做得再细一点,比如去掉停用词;比如词性stemmerazation和lemmatization,这个在nltk都是有现成的python包的,可以直接调用;
再比如歌单名找词的时候,遇到没有对应词的情况,我直接返回了随机的500首,其实可以用一些fasttext预训练的word embedding, 找出现在矩阵中词集合最相似的近义词;
有一点遗憾,可能加上这些方法,应该会取得更好的名次,但学习的路漫漫,持之以恒才是王道呀。
一些不大成功的尝试
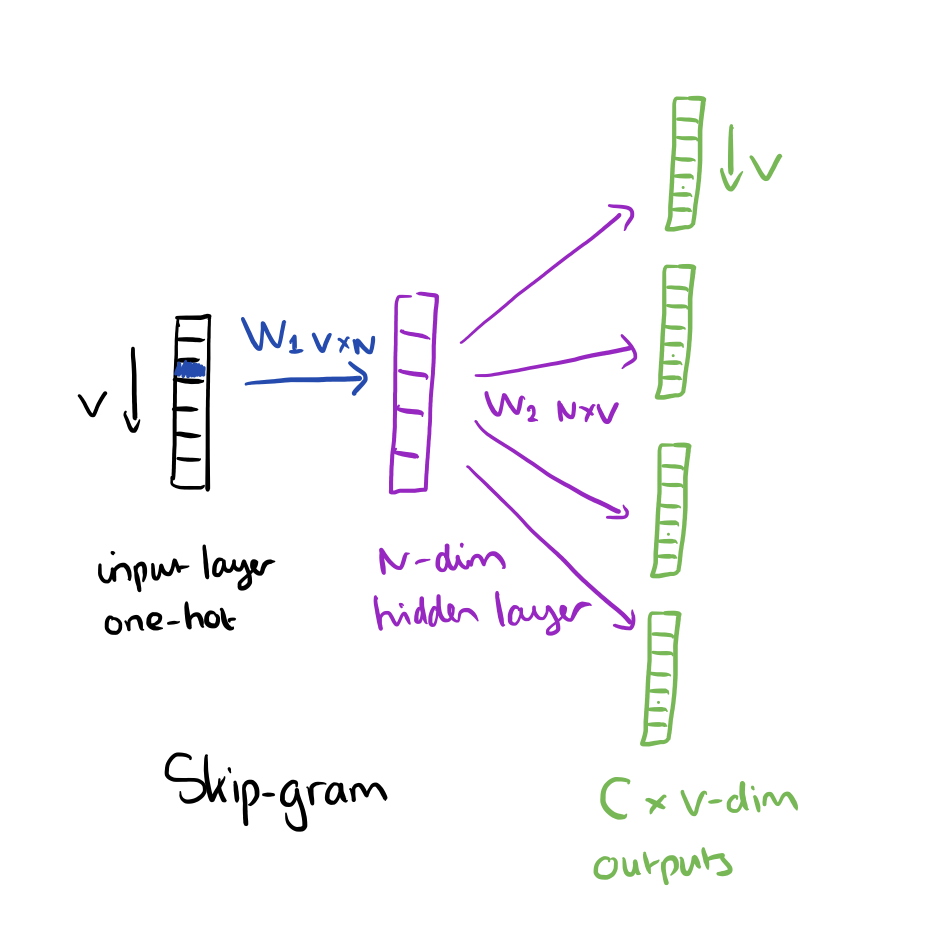
word2vec
word2vec其实本质用得也是单曲间共现的关系;类似文本,我们把每个歌单当作一个document,把每首歌当做一个单词,扔到gensim word2vec模型去训练,然后找和歌单中出现的单曲集合最相似的不包含歌单单曲的500首单曲,gensim把代码封装的很好,直接将这个集合丢进去就可以了,不需要每首歌依次计算求平均,这里的代码也分享出来吧
训练的:
https://github.com/LauraBowenHe/Recsys-Spotify-2018-challenge/blob/master/try/word2vec.py
预测的:
https://github.com/LauraBowenHe/Recsys-Spotify-2018-challenge/blob/master/try/prediction_v12.py
但效果并没有协同过滤好,印象中r-precision相差3~4个百分点。
ensemble cf
我们想到,既然能用单曲-歌单的关系,那么artist-歌单的关系,album-歌单的关系,应该都能用吧,计算出来的相似度加权平均效果应该会更好,但实验结果发现,ensemble并无显示提高,有时候甚至有一点点下降,可能的原因,只利用这些例如单曲-歌单的共现关系的话,单曲中已经涵盖了artist和album的信息,很有可能再单独加入使得信息冗余,进而降低准确率。
star embedding
facebook发了一篇很牛逼的论文,大概是说embedding everything,相关代码也开源了,尝试了一下不是很会用。。时间紧迫就没有作过多的探索放弃了
其他选手的方法
因为举办方要求所有参赛选手把代码开源,于是上github欣赏了一下其他参赛选手的方法,看到挺有意思的也作了简单的总结:
今天太累了…
待续…